
| 일 | 월 | 화 | 수 | 목 | 금 | 토 |
|---|---|---|---|---|---|---|
| 1 | 2 | 3 | 4 | 5 | ||
| 6 | 7 | 8 | 9 | 10 | 11 | 12 |
| 13 | 14 | 15 | 16 | 17 | 18 | 19 |
| 20 | 21 | 22 | 23 | 24 | 25 | 26 |
| 27 | 28 | 29 | 30 |
- 백준
- react
- Spring Boot
- EventListener
- BFS
- AWS
- 탐욕법
- Algorithm
- 서버구축
- 알고리즘
- url parsing
- 스터디
- 완전탐색
- 브루트포스
- EC2
- spring
- Router
- sort
- 정렬
- 자료구조
- 다익스트라 알고리즘
- 라우터
- 백준알고리즘
- 동적프로그래밍
- mysql
- 리액트
- java
- 토이프로젝트
- nodejs
- ELB
- Today
- Total
공부하는 블로그
Node.js | Node.js - MySQL : 연동하기 본문
Node.js - MySQL
MySQL은 오픈 소스의 관계형 데이터베이스 관리 시스템(RDBMS)으로 기존의 파일 시스템보다 훨씬 효율적으로 데이터를 관리할 수 있다. Node.js와 MySQL을 연동하기 위해서는 기본적으로 컴퓨터에 MySQL이 설치되어 있어야 하며 npm을 이용하여 외장 모듈인 'mysql'을 설치해주어야 한다.
※ Node.js에서는 MySQL의 최신버전과의 연동을 지원하지 않는다. 따라서 MySQL을 설치할 때 인증 방법(Authentication Method)를 v8.0이 아닌 v5.x를 따르도록 해야한다. (2019.12.28 기준)
MySQL | MySQL 설치 - Window
관계형 데이터베이스인 MySQL을 설치해보자. 아래의 링크는 MySQL Community 버전을 다운로드하는 페이지이다. MySQL :: Download MySQL Installer Select Operating System: Select Operating System… Mic..
gongbu-ing.tistory.com
$ npm install mysqlboard.sql
CREATE DATABASE db_test;

CREATE TABLE BOARD(
    ID VARCHAR2(50),
    TITLE VARCHAR2(200),
    CONTENT VARCHAR2(1000),
    WDATE DATE
);
cmd창에서 mysql을 실행하여 사용할 DB와 TABLE을 미리 생성하였다.
모든 준비가 끝났으니 이제 MySQL을 Node.js 서버와 연결하는 모듈을 생성해보자. 'mysql.createConnection()'을 이용하면 DB와 서버를 연결하는 객체를 만들 수 있으며 이를 이용하여 각종 쿼리(Query)를 실행시킬 수 있다.
config/database.js
var mysql = require('mysql');
var db_info = {
    host: 'localhost',
    port: '3306',
    user: 'user_name',
    password: 'password',
    database: 'db_name'
}

module.exports = {
    init: function () {
        return mysql.createConnection(db_info);
    },
    connect: function(conn) {
        conn.connect(function(err) {
            if(err) console.error('mysql connection error : ' + err);
            else console.log('mysql is connected successfully!');
        });
    }
}
위의 모듈은 DB와 서버간의 연결 객체를 반환하는 'init()' 함수와 실제로 데이터 교환을 위해 연결을 시키는 'connect()' 함수로 구성되어 있다. 'createConnection()'에는 DB에 대한 정보(db_info)를 매개변수로 넣어주어야 한다.
· host : 사용할 DB가 설치된 호스트의 IP
· port : DB를 설치할 때 사용자가 지정한 포트번호. 따로 지정해주지 않았다면 기본값은 3306이다.
· user : DB의 user 이름
· password : DB를 설치할 때 사용자가 지정한 비밀번호
· database : 사용할 데이터베이스의 이름
이제 모듈을 사용하여 DB와 서버를 연결한 후 쿼리문을 실행하여 데이터 처리작업을 진행해보자.
app.js
var express = require('express');
var app = express();
var db_config = require(__dirname + '/config/database.js');
var conn = db_config.init();
var bodyParser = require('body-parser');

db_config.connect(conn);

app.set('views', __dirname + '/views');
app.set('view engine', 'ejs');

app.use(bodyParser.json());
app.use(bodyParser.urlencoded({extended : false}));

app.get('/', function (req, res) {
    res.send('ROOT');
});

app.get('/list', function (req, res) {
    var sql = 'SELECT * FROM BOARD';
    conn.query(sql, function (err, rows, fields) {
        if(err) console.log('query is not excuted. select fail...\n' + err);
        else res.render('list.ejs', {list : rows});
    });
});

app.get('/write', function (req, res) {
    res.render('write.ejs');
});

app.post('/writeAf', function (req, res) {
    var body = req.body;
    console.log(body);

    var sql = 'INSERT INTO BOARD VALUES(?, ?, ?, NOW())';
    var params = [body.id, body.title, body.content];
    console.log(sql);
    conn.query(sql, params, function(err) {
        if(err) console.log('query is not excuted. insert fail...\n' + err);
        else res.redirect('/list');
    });
});

app.listen(3000, () => console.log('Server is running on port 3000...'));
간단한 게시판 글쓰기와 글목록 서버를 구현해보았다. 템플릿 엔진은 'ejs'를 사용하였고 post방식으로 클라이언트로부터 넘겨받은 글쓰기 데이터들은 'body-parser'를 이용하여 받아내 DB로 전송해주었다. 쿼리문의 실행은 createConnection()을 이용하여 만들어진 연결 객체에 있는 'query()' 메소드를 이용하면 된다.
'query(sql, params, callback)'의 형태로 사용되며 각각의 파라미터의 역할은 다음과 같다.
·sql : 문자열 형태의 실행할 쿼리문. '?'를 이용하여 서버에서 정의된 변수를 사용 가능.
·params : 쿼리문에 서버에서 정의된 변수를 사용할 때 필요한 파라미터. 배열 형식으로 입력
·callback : 쿼리문 실행이 완료되면 불러올 함수를 정의. SELECT문의 경우 콜백 함수의 파라미터 중 rows를 이용하여 조회된 데이터를 배열 형식으로 가져옴.
이제 작성된 클라이언트 코드(view)를 살펴보도록 하자.
views/list.ejs
<html>
    <head>
        <meta charset="utf-8">
        <title>게시글</title>
    </head>
    <body>
        <h2>게시글 리스트</h2>
        <table border='1'>
            <colgroup>
                <col width='60'><col width='200'><col width='100'>
            </colgroup>
            <thead>
                <tr>
                    <th>글번호</th>
                    <th>글제목</th>
                    <th>작성자</th>
                </tr>
            </thead>
            <tbody>
                <% for(i = 0; i < list.length; i++) { %>
                <tr>
                    <td><%=i+1 %></td>
                    <td><%=list[i].TITLE %></td>
                    <td><%=list[i].ID %></td>
                </tr>
                <% } %>
            </tbody>
        </table boader='1'>

        <button onclick="location.href='../write'">글쓰기</button>
    </body>
</html>
views/write.ejs
<html>
    <head>
        <meta charset="utf-8">
        <title>글쓰기</title>
    </head>
    <body>
        <h2>게시글 작성</h2>
        <form action='/writeAf' method='post'>
            작성자 : <input type='text' name='id'><br>
            제목 : <input type='text' name='title'><br>
            내용 : <textarea name='content'></textarea><br>
            <button type='submit'>글쓰기</button>
        </form>
    </body>
</html>
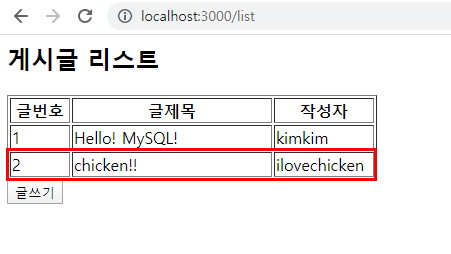
이제 서버를 작동시켜 쿼리문이 제대로 실행되는지 확인해보자.

'Node.js' 카테고리의 다른 글
| Node.js | Node.js - MySQL : Multiple Statements (0) | 2020.01.18 |
|---|---|
| Node.js | Express : Template Engine (0) | 2019.12.28 |
| Node.js | Express : Request Parameters (0) | 2019.12.23 |
| Node.js | Express : Routing (0) | 2019.12.19 |
| Node.js | Express : Intro (0) | 2019.12.19 |


